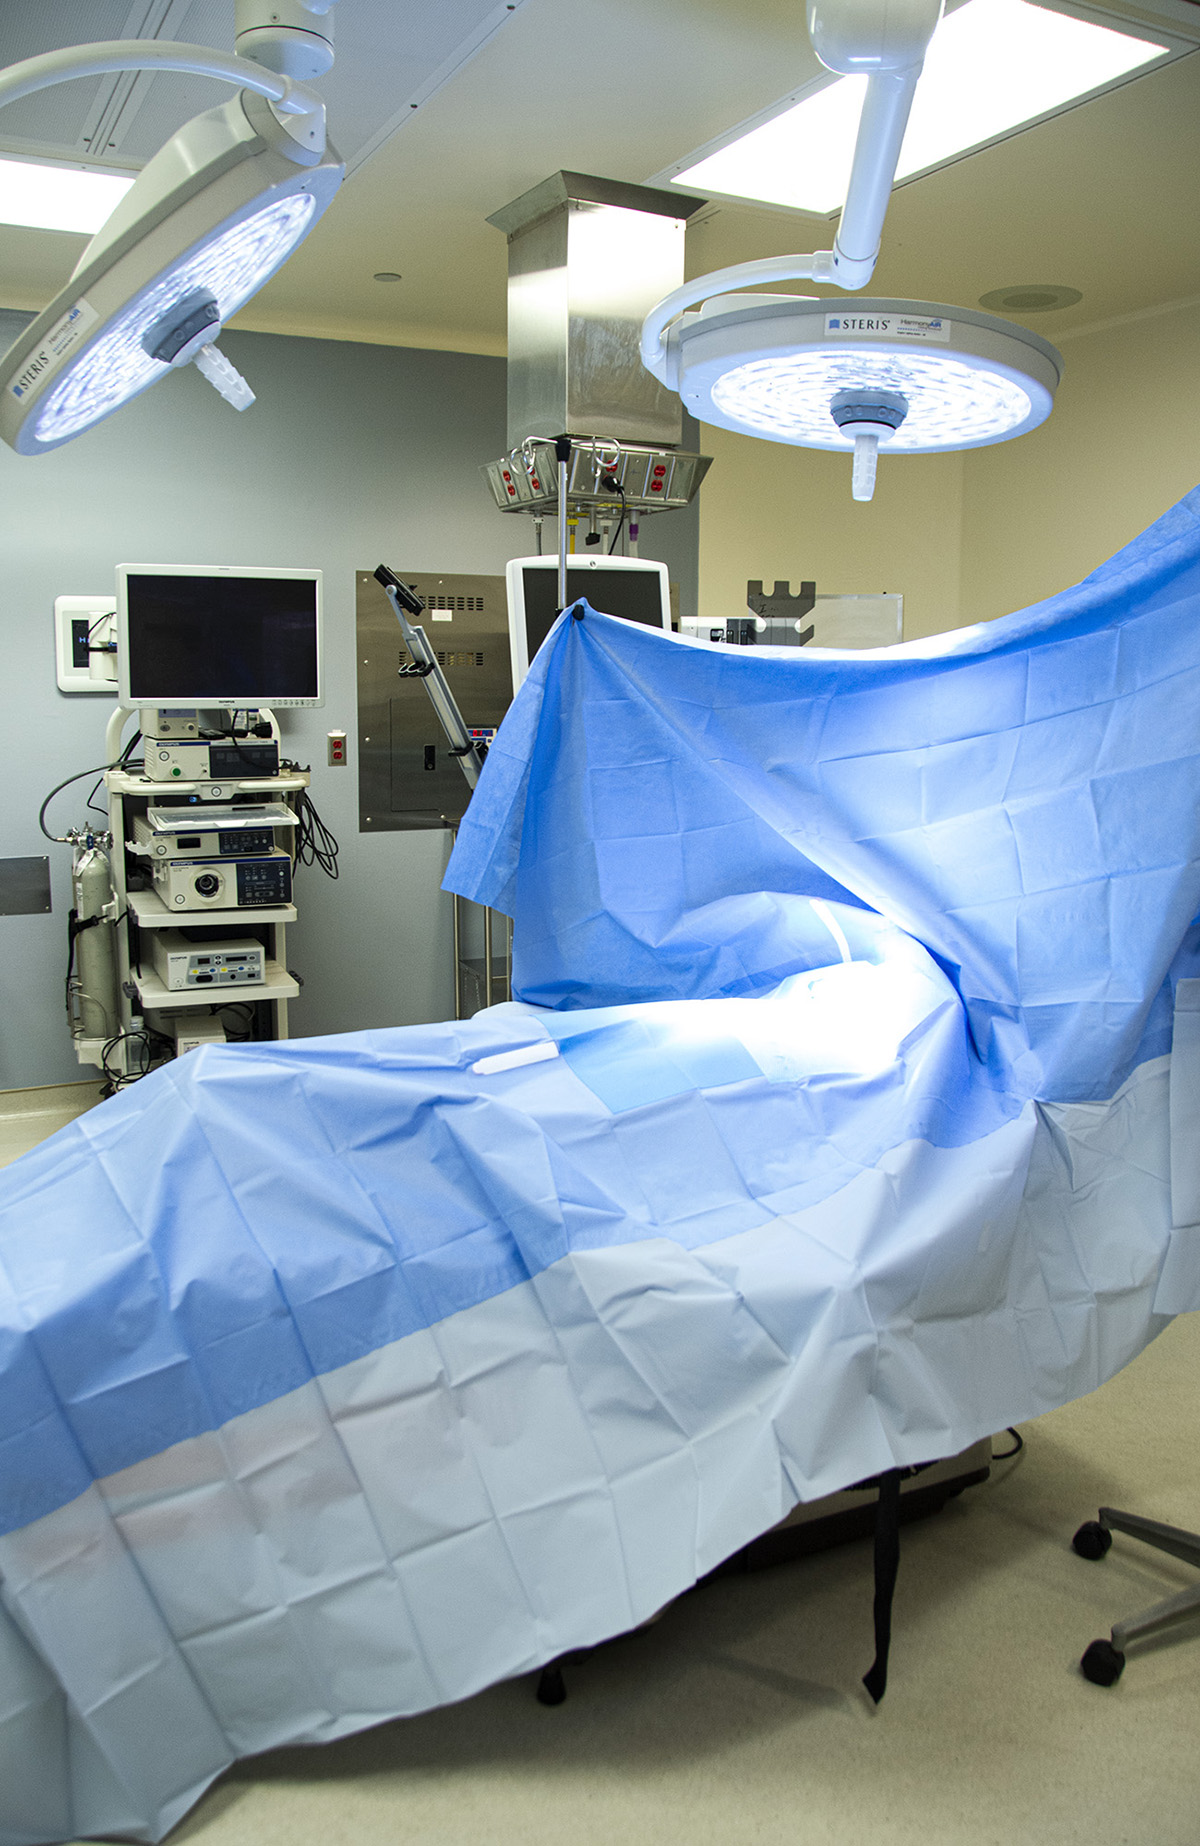
Establishing the Sterile Field with Surgical Drapes
The surgical team creates a ‘sterile field’ by applying sterile surgical drapes over the patient and any surrounding equipment or surfaces that scrubbed personnel may encounter. The drape which covers the patient is placed in such a manner that the surgical site which has been ‘prepped,’ is the only skin surface that is exposed.
Each surgical procedure is slightly different and may require distinctive styles, shapes, or combinations of drapes. Surgical drapes come in many different configurations. They can be disposable or reusable. Learn more about reusable and disposable drapes.
(King & Spry, 2019; ORNAC, 2021)

Selecting and Ordering the Perfect Drapes
Whether reusable or disposable, ORNAC standards recommend that perioperative personnel look for the following qualities when purchasing surgical drapes:
- Review barrier properties including fluid resistance (strikethrough) and tear/puncture resistance.
- They should be lint-free or low-linting.
- They should be antistatic.
- They should prevent the buildup of heat.
- They should have a dull or nonglare surface.
- They should be free of toxins.
- They should be flame resistant.
- They should be malleable.
(ORNAC, 2021)
Surgeon Selection of Surgical Drape
When selecting a specific drape for a surgical procedure, a surgeon will consider:
- The location of the incision.
- The size of the incision.
- The size of the sterile field.
- The number of scrubbed personnel.
- The type of surgical equipment and instruments that are required in the surgical field.
(ORNAC, 2021)
Considerations When Draping
Scrubbed personnel must be meticulous with their sterile technique when establishing the sterile field with drapes. Specific considerations for scrubbed personnel when placing drapes include:
- Handling the drapes as little as possible.
- Maintaining the drapes at waist level until placed.
- Using the cuff technique to protect gloved hands within the drape when placing on the patient or handing off the edge.
- Not flipping, fanning or shaking drapes.
- Always draping the area closest to the incision first and moving away to the periphery after.
- Securing the drapes with non-perforating clips.
- Avoid moving the drapes or adjusting them after they have been placed.
If there is any concern about contamination when placing drapes, the drapes and scrubbed personnel are considered contaminated.
(ORNAC, 2021; King & Spry, 2019)
Standard Drape Set Up
Because every surgical procedure is unique, there is no standard setup. You will find that within a facility or with a specific surgeon, there are set preferences and protocols for the cases that are being performed. In general, there are a few considerations that one must always follow:
- A full sheet is used to cover back tables, instrument tables, body regions not being operated on, and equipment near the surgical field.
- These sheets must cover the surface and provide a margin of safety between the surgical field and other equipment.
- These drapes can be impervious, semi-impermeable, and come in diverse sizes and configurations
Watch this video for an example of draping for a laparotomy:
Maintaining the Sterile Field
Once the sterile field is established, it is every perioperative team member’s responsibility to ensure it is maintained. Items that may have fallen off the edge of the patient drape, such as suction or cautery, are no longer considered sterile and must be allowed to drop off the sterile field so the circulating nurse can remove them. Non-scrubbed personnel must ensure that they maintain a distance of at least one foot from any draped item so as not to contaminate the sterile field.
💬 Communication Highlight
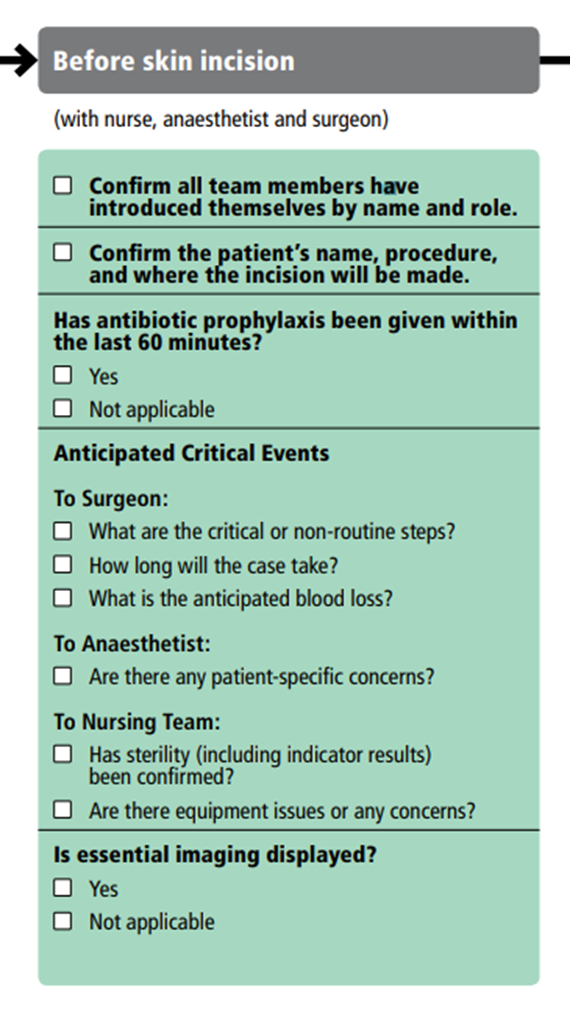
The Surgical Safety Checklist Part 2: The TIME OUT
You were introduced to the surgical safety checklist as a patient safety tool in course 1. You reviewed part 1 (the briefing) prior to the induction of anesthesia. Now after the surgical drapes are in place but BEFORE the skin incision, part 2 of the surgical safety checklist must occur – the TIME OUT.
Immediately before the incision is made (or the procedure begins). A time-out is performed where the surgical team communicates and pauses to confirm the procedure, ensuring that antibiotic prophylaxis has been given within the correct timing.
This is a final check-in with the surgical team to communicate any anticipated challenges or critical events that all should be prepared for.
Remember that each institution is encouraged to adapt the surgical safety checklist to best suit their needs. The WHO recommends the following information be covered in the surgical Time Out (also sometimes called the pause):
📽️ AORN CINE-MED VIDEO
Navigate to the AORN Cine-Med website and make sure that you are logged in before clicking on the link below.
- Watch the AORN Cine-Med Video on Sterile Technique and Draping. You can check out specific draping methods for various procedures.
- Download the included Study Guide to follow along.
- (Thread to follow in Cine-Med – Aseptic practices – Surgical Draping: Evidence-based Practices)
- Runtime – 16 minutes